
You will now get the "Source and Destination Tables" Form as shown in the screenshot below

In this form you can click the "Target Table" drop down
list to choose a different existing target table to load the data for
corresponding source table.
When you click the target drop down list Data Loader will show the list of
existing tables and also it lets you type in a new table name. In the
Description column Data
Loader will show whether the target table exist in the target database or not.
If the target table does not exist then Data Loader will create it automatically with matching datatypes and widths.
In this tutorial we don't need to do any Column Mapping or change any table datatypes so we can just click Next button in this Screen and Skip the rest of the advance section.
If you want to choose a different datatype for a particular column or different width then you can do so in Column Mapping screen.
In the Column Mapping Screen beside changing datatypes and
widths you can also map Source and Target table columns and also define
WHERE condition to filter rows,
specify options whether to Import Constraints and Indexes and specify load
options.
To get to this Column Mapping screen you will need to click "Col Mapping" button lies between the each Source and Target Table.
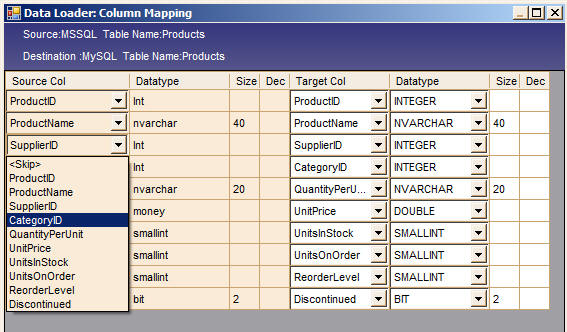
Let's click the "Col Mapping" for Products table. After clicking the button you will get the following screen

In this Form you can map source column to target table
columns. For Example If you want insert data from CategoryID Column to
SupplierID column and SupplierID
column to CategoryID column, then, you can do it by clicking on Source Col
drop down list and choose the required column as show below


You can also change the datatype of the target columns by clicking on
Datatype Drop Down List. Similarly you can also change the Size of target
table columns by
typing in the Size cell.
Note: You will not be able to change the target datatype or
size of target table if the target table already exist. You can change these
only if the target table doesn't exist.
However you can do column mapping even if the table exist by clicking Source
Col Dropdown list to match corresponding target columns
You can check the "Import Constraint" , "Import Indexes" and "Import Default Values" checkboxes if you can to import Constraints, Indexes and Default Values.

If you choose this option then destination table will be drop and a new table will be created with the same structure as source every time Session is run.
If you choose this Option then existing rows of the Destination table will be deleted permanently and then rows are loaded from the source
This is the Default Option. If you choose this option then Data Loader will add rows to the existing table irrespective of whether target table contain rows or not.
UPSERT
This feature will update row in the target table if a
matching row exist otherwise if the matching row does not
exist it will insert a new row.
INSERT
This feature will insert a row in the target table only if
the matching row does not exist.

This section will be enabled only when you choose UPSERT or INSERT loading
option. Here you can specify the comparing columns to be used for
matching Source
and Target table for row existence. You can specify Maximum two compare
columns.

In this section you can specify the WHERE condition to filter rows from
Source table. This is handy if you want to load only those rows matching a
particular criteria
instead of loading all rows.